
daca torn apa in vasul de expansiune curge tot pe acolo.este un cot simplu din plastic care intra in motor . nu stiu ce fel este prinderea acolo pentru ca s-a rupt.
- LeonteMihai
- ***
- 533 mesaje
- din 27 Oct 2011
- Astra 2006 z13dth
- Constanta
LeonteMihai
- Mesaje scrise: 533
- Locatie: Constanta
- Masina: Astra 2006 z13dth
- Status: Offline
- Cont inregistrat: 27 Oct 2011
- Mesaj Privat
- AdyBossu
- **

- 320 mesaje
- din 09 Nov 2007
- Astra 2004 1,7 cdti
- Iasi
AdyBossu
- Mesaje scrise: 320
- Locatie: Iasi
- Masina: Astra 2004 1,7 cdti
- Status: Offline
- Cont inregistrat: 09 Nov 2007
- Mesaj Privat
horaa- Suspendat
- 3,472 mesaje
- din 05 Oct 2012
- Astra 2012 a14net
- Bihor
horaa- Mesaje scrise: 3,472
- Locatie: Bihor
- Masina: Astra 2012 a14net
- Status: Offline
- Cont inregistrat: 05 Oct 2012
- Mesaj Privat
- iulian1971
- *******

- 7,081 mesaje
- din 21 Dec 2006
- Astra 2008 Z19DTH
- Ilfov
iulian1971
- Mesaje scrise: 7,081
- Locatie: Ilfov
- Masina: Astra 2008 Z19DTH
- Status: Offline
- Cont inregistrat: 21 Dec 2006
- Mesaj Privat
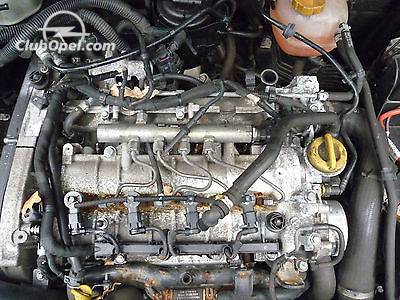
LeonteMihai a scris:daca torn apa in vasul de expansiune curge tot pe acolo.este un cot simplu din plastic care intra in motor . nu stiu ce fel este prinderea acolo pentru ca s-a rupt.
Care cot e sub EGR ?
Pune o poza ceva. Eu am schimbat vreo 3 furtune sparte in 2 ani dar nu stiu de nici un cot de plastic sub EGR.
- nba25
- **
- 181 mesaje
- din 03 Oct 2006
- Astra 2007 1.7 CDTI
- Vulcan
nba25
- Mesaje scrise: 181
- Locatie: Vulcan
- Masina: Astra 2007 1.7 CDTI
- Status: Offline
- Cont inregistrat: 03 Oct 2006
- Mesaj Privat
- iulian1971
- *******
- 7,081 mesaje
- din 21 Dec 2006
- Astra 2008 Z19DTH
- Ilfov
iulian1971
- Mesaje scrise: 7,081
- Locatie: Ilfov
- Masina: Astra 2008 Z19DTH
- Status: Offline
- Cont inregistrat: 21 Dec 2006
- Mesaj Privat
1. Open bonnet
2. Disconnect battery
• Detach earth connection from earth terminal
– Slacken nut
3. Remove front panelling
4. Raise vehicle by half its height
5. Detach the lower engine cover and right engine splash guard
6. Place collecting basin underneath.
7. Drain coolant
• Open drain bolt on radiator (1)
• Collect coolant
• Close drain bolt
8. Detach wiring harness from radiator
• Detach wiring harness plug (1) from fan motor
– Undo cable tie
9. Detach refrigerant line (1) from radiator
• Open and remove clip (4)
10. Detach compressor wiring harness (2) from radiator
• Undo clip
11. Detach right coolant hose (3) from radiator
• Release clamp
12. Detach 2x vacuum lines (5) from radiator
• Unclip from bracket
13. Secure radiator at upper radiator brackets (1)
• Insert 2x suitable tools from behind
14. Remove lower radiator bracket (1)
Note: Note: brackets are not the same
• Unscrew 4x bolts
15. Remove pre-glow system control unit
16. Detach expansion tank coolant hose (2) from radiator
• Release clamp
17. Detach left coolant hose (1) from radiator
• Release clamp
18. Detach charge air hose (1) from charge air pipe.
• Release clamp
19. Detach fan housing from radiator
• Unscrew 2x bolts (2)
• Unclip charge air pipe (1)
20. Raise vehicle by half its height
21. Suspend condenser from top of front panel
22. Detach condenser with auxiliary fan and intercooler from radiator
• Unscrew 4x bolts (1-3) and (5)
• Pull intercooler from bracket (4)
23. Remove radiator
• Remove 2x fuses from bracket
24. Modify attaching parts
• Vacuum line brackets
• 2x rubber on radiator mounting
• 6x locking nuts
Install
25. Install radiator
• Insert 2x fuses in bracket
26. Attach condenser with auxiliary fan and intercooler to radiator
• Insert condenser into bracket
Important: Insert bolt with thread locking compound
• Tighten 4x bolt 5 Nm
27. Detach condenser from top of front plate
28. Raise vehicle by half its height
29. Install lower radiator bracket
Note: Note: brackets are not the same
• Tighten 4x bolt 15 Nm
30. Remove 2x retainers from upper radiator bracket
31. Vehicles with AT: attach lower oil cooling line to oil cooler
• Insert oil cooling line
• Install securing clamp KM-J-41623-B
32. Attach wiring harness to radiator
• Connect wiring harness plug to fan motor
• Attach cable ties
33. Lower vehicle by its full height
34. Vehicles with AT: attach upper oil cooling line to oil cooler
• Insert oil cooling line
• Install securing clamp KM-J-41623-B
35. Attach fan housing to radiator
• Insert into bracket
Tighten 2x bolts
• Clip in charge air pipe
36. Attach charge air hose to charge air pipe
• Fasten clamp
37. Attach left coolant hose to radiator
• Fasten clamp
38. Attach expansion tank coolant hose to radiator
• Fasten clamp
39. Install pre-glow system control unit
40. Raise vehicle by its full height
41. Attach 2x vacuum lines from radiator
• Clip into bracket
42. Attach right coolant hose to radiator
• Fasten clamp
43. Attach compressor wiring harness to radiator
• Attach clip
44. Attach refrigerant line to radiator
• Install and close clip
45. Attach the lower engine cover and right engine splash guard
46. Lower vehicle by half its height
47. Fit front panelling
48. Vehicles with AT: install air cleaner housing
49. Connect battery
• Attach ground connection to ground terminal
– Tighten nut
50. Fill and bleed cooling system
51. Vehicles with AT: correct transmission fluid level
52. Close bonnet
53. Program volatile memories
Sper ca n-am uitat nimic.

- nba25
- **
- 181 mesaje
- din 03 Oct 2006
- Astra 2007 1.7 CDTI
- Vulcan
nba25
- Mesaje scrise: 181
- Locatie: Vulcan
- Masina: Astra 2007 1.7 CDTI
- Status: Offline
- Cont inregistrat: 03 Oct 2006
- Mesaj Privat
- iulian1971
- *******
- 7,081 mesaje
- din 21 Dec 2006
- Astra 2008 Z19DTH
- Ilfov
iulian1971
- Mesaje scrise: 7,081
- Locatie: Ilfov
- Masina: Astra 2008 Z19DTH
- Status: Offline
- Cont inregistrat: 21 Dec 2006
- Mesaj Privat
- alealexandru
- *
- 1 mesaje
- din 23 Sep 2016
- Astra 2006 Y17DT
- Arges
alealexandru
- Mesaje scrise: 1
- Locatie: Arges
- Masina: Astra 2006 Y17DT
- Status: Offline
- Cont inregistrat: 23 Sep 2016
- Mesaj Privat
- zimbrul001
- *
- 8 mesaje
- din 06 Mar 2016
- Astra 2006
- Bucuresti
zimbrul001
- Mesaje scrise: 8
- Locatie: Bucuresti
- Masina: Astra 2006
- Status: Offline
- Cont inregistrat: 06 Mar 2016
- Mesaj Privat
Salutare. Tocmai am constatat ca am pierdut tot lichidul de racire la Opel Astra H 1.4 benzina 2006. Motor Z14XEP. Am vazut umezeala in zona pompei de apa. Intrebarea mea este daca se schimba toata pompa sau doar etansarea?
De asemenea am vazut pe forum ca exista un meniu secret care poate fi afisat pe displayul radioului. Cum se face acest lucru ? Este realizabil si la modelele cu display mic si fara computer de bord ?
Multumesc
De asemenea am vazut pe forum ca exista un meniu secret care poate fi afisat pe displayul radioului. Cum se face acest lucru ? Este realizabil si la modelele cu display mic si fara computer de bord ?
Multumesc
RazvanRZV
- Mesaje scrise: 9
- Locatie: Bucuresti
- Masina: Astra 2005
- Status: Offline
- Cont inregistrat: 31 Aug 2016
- Mesaj Privat
Salut,
Am si eu un Opel Astra H 1.7 CDTI si astazi am constata ca am ramas fara lichid de racire. Nu am cum sa ma bag eu sa schimb furtunele ( lipsa de spatiu timp dexteritate ) dar as vrea sa stiu daca aveti un service bun pe care il puteti recomanda in sec 6 sau sec 5 Bucuresti ?
Multumesc anticipat!
Am si eu un Opel Astra H 1.7 CDTI si astazi am constata ca am ramas fara lichid de racire. Nu am cum sa ma bag eu sa schimb furtunele ( lipsa de spatiu timp dexteritate ) dar as vrea sa stiu daca aveti un service bun pe care il puteti recomanda in sec 6 sau sec 5 Bucuresti ?
Multumesc anticipat!

ChelYe
- Mesaje scrise: 23
- Locatie: Bucuresti
- Masina: Astra 2005 Z19DTH
- Status: Offline
- Cont inregistrat: 18 Dec 2015
- Mesaj Privat
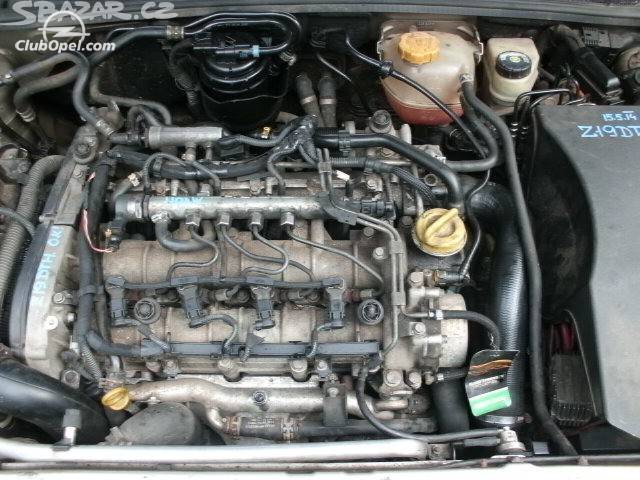
Salutare , ca sa nu deschid un alt topic , rog pe cine are sa-mi ataseze o poza cu ordinea furtunelor din vasul de expansiune-motor-radiator , pentru Astra H 1,9 DTH .
Am 2 furtune sparte , au fost demontate pentru inlocuire si nu m-am gandit sa fac o poza cu oridinea lor de montaj , este dat jos si vasul . Nu stiu daca la fata locului o sa-mi "arate" ele cum se monteaza . Multumesc !
Am 2 furtune sparte , au fost demontate pentru inlocuire si nu m-am gandit sa fac o poza cu oridinea lor de montaj , este dat jos si vasul . Nu stiu daca la fata locului o sa-mi "arate" ele cum se monteaza . Multumesc !
- bibu16v
- *******

- 6,527 mesaje
- din 25 Jan 2016
- Astra 1995 X16XEL
- Alta tara
bibu16v
- Mesaje scrise: 6,527
- Locatie: Alta tara
- Masina: Astra 1995 X16XEL
- Status: Offline
- Cont inregistrat: 25 Jan 2016
- Mesaj Privat

ChelYe
- Mesaje scrise: 23
- Locatie: Bucuresti
- Masina: Astra 2005 Z19DTH
- Status: Offline
- Cont inregistrat: 18 Dec 2015
- Mesaj Privat
- florinbucsa
- ***

- 733 mesaje
- din 16 Oct 2008
- Astra 2005 z17dth
- Bucuresti
florinbucsa
- Mesaje scrise: 733
- Locatie: Bucuresti
- Masina: Astra 2005 z17dth
- Status: Offline
- Cont inregistrat: 16 Oct 2008
- Mesaj Privat
Salut. Cred ca a venit vremea sa incep sa schimb furtunele masinii mele. Anul trecut in toamna m-a lasat cel de retur habitaclu, iar zilele trecute chiar in duminica de paste mi s-a spart si cel de retur habitaclu. Ma gandeam cu ocazia asta sa incep usor-usor sa le inlocuiesc pe toate, dar pretul pe original mi se pare tare scump. Am vazut ca unii colegi au pus furtune siliconice (cele de culoare albastra). Cum se prezinta acele furtune si de unde le-ati cumparat?
ChelYe
- Mesaje scrise: 23
- Locatie: Bucuresti
- Masina: Astra 2005 Z19DTH
- Status: Offline
- Cont inregistrat: 18 Dec 2015
- Mesaj Privat
- florinbucsa
- ***
- 733 mesaje
- din 16 Oct 2008
- Astra 2005 z17dth
- Bucuresti
florinbucsa
- Mesaje scrise: 733
- Locatie: Bucuresti
- Masina: Astra 2005 z17dth
- Status: Offline
- Cont inregistrat: 16 Oct 2008
- Mesaj Privat
- iulian1971
- *******
- 7,081 mesaje
- din 21 Dec 2006
- Astra 2008 Z19DTH
- Ilfov
iulian1971
- Mesaje scrise: 7,081
- Locatie: Ilfov
- Masina: Astra 2008 Z19DTH
- Status: Offline
- Cont inregistrat: 21 Dec 2006
- Mesaj Privat
- Blackburn21
- **
- 56 mesaje
- din 19 Oct 2015
- Astra 2004 Z14XEP
- Bucuresti
Blackburn21
- Mesaje scrise: 56
- Locatie: Bucuresti
- Masina: Astra 2004 Z14XEP
- Status: Offline
- Cont inregistrat: 19 Oct 2015
- Mesaj Privat
Salut, am pierderi de antigel (cam 2 degete de antigel in vas la 100 km) dar nu se vede nicio urma (nu au vazut nici cei din service, am schimabt busonul si degeaba). Mentionez ca in toamna am facut si o segmentare, e posibil sa aiba legatura avand in vedere ca problema a aparut dupa segmentare?
- cutienoua
- **
- 326 mesaje
- din 28 Mar 2016
- Astra 2009 Y17DT
- Mehedinti
cutienoua
- Mesaje scrise: 326
- Locatie: Mehedinti
- Masina: Astra 2009 Y17DT
- Status: Offline
- Cont inregistrat: 28 Mar 2016
- Mesaj Privat
Intra in ClubOpel!
![]() Cea mai mare comunitate Opel
Cea mai mare comunitate Opel
![]() Intalniri locale
Intalniri locale
![]() Skip Ads
Skip Ads
![]() Vinzi/Cumperi
Vinzi/Cumperi
![]() Gratuit pe viata
Gratuit pe viata