
Incearca pe site-ul Hella, gasesti toate componentele acolo, probabil iti lipseste partea din AFL, dar daca ai becul si balastul, ar trebui sa functioneze... Atentie si cum incerci sa le verifici, sa tii cont cont si de CAN, ca daca mufezi farul si ai deja ON in blocul de lumini, nu se va aprinde
- GabiB77
- ****

- 2,346 mesaje
- din 05 Jul 2005
- Bucuresti
GabiB77
- Mesaje scrise: 2,346
- Locatie: Bucuresti
- Masina:
- Status: Offline
- Cont inregistrat: 05 Jul 2005
- Mesaj Privat
- alex82
- **
- 123 mesaje
- din 19 Apr 2006
- Insignia 2012 2.0 dth
- Constanta
alex82
- Mesaje scrise: 123
- Locatie: Constanta
- Masina: Insignia 2012 2.0 dth
- Status: Offline
- Cont inregistrat: 19 Apr 2006
- Mesaj Privat
GabiB-77 a scris:Incearca pe site-ul Hella, gasesti toate componentele acolo, probabil iti lipseste partea din AFL, dar daca ai becul si balastul, ar trebui sa functioneze... Atentie si cum incerci sa le verifici, sa tii cont cont si de CAN, ca daca mufezi farul si ai deja ON in blocul de lumini, nu se va aprinde
Cica ar trebui schimbat un pin dar care cine stie 😊
- GabiB77
- ****
- 2,346 mesaje
- din 05 Jul 2005
- Bucuresti
GabiB77
- Mesaje scrise: 2,346
- Locatie: Bucuresti
- Masina:
- Status: Offline
- Cont inregistrat: 05 Jul 2005
- Mesaj Privat
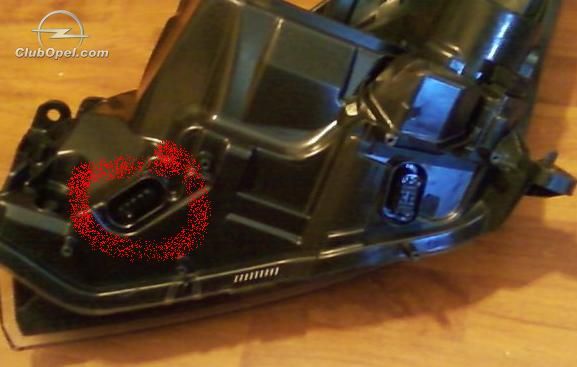
In urma unei intalniri cu Alex82 am mai descoperit ceva, atentie la faruri, alea care au si a 3-a mufa in partea de jos (incercuita cu rosu in imagine), cea pentru modulul AFL, nu le functioneaza reglajul far din blocul de lumini - in cazul acestor faruri mai trebuie modificat ceva ca sa functioneze motorasul de reglaj far

Ultima modificare făcută de GabiB77 la Mie 19 Jan, 2011 11:49 pm
Ultima modificare făcută de GabiB77 la Mie 19 Jan, 2011 11:49 pm
- rstefan
- **
- 454 mesaje
- din 10 Jul 2006
- Astra 2005 Z17DTH
- Bucuresti
rstefan
- Mesaje scrise: 454
- Locatie: Bucuresti
- Masina: Astra 2005 Z17DTH
- Status: Offline
- Cont inregistrat: 10 Jul 2006
- Mesaj Privat
- alex82
- **
- 123 mesaje
- din 19 Apr 2006
- Insignia 2012 2.0 dth
- Constanta
alex82
- Mesaje scrise: 123
- Locatie: Constanta
- Masina: Insignia 2012 2.0 dth
- Status: Offline
- Cont inregistrat: 19 Apr 2006
- Mesaj Privat
rstefan a scris:Pe unde ati gasit asa ieftin farurile? La banii astia m-as baga sa mi le schimb si eu pe ale mele..
Te cred ca le-ai schimba si tu dar problema e ca nu exista atat de multe faruri ptr toti 😊))Eu le-am gasit pe net ca am cautat in fiecare seara, restu nu stiu.
- alex82
- **
- 123 mesaje
- din 19 Apr 2006
- Insignia 2012 2.0 dth
- Constanta
alex82
- Mesaje scrise: 123
- Locatie: Constanta
- Masina: Insignia 2012 2.0 dth
- Status: Offline
- Cont inregistrat: 19 Apr 2006
- Mesaj Privat
Uitati cum se monteaza farurile cu xenon in locul celor normal
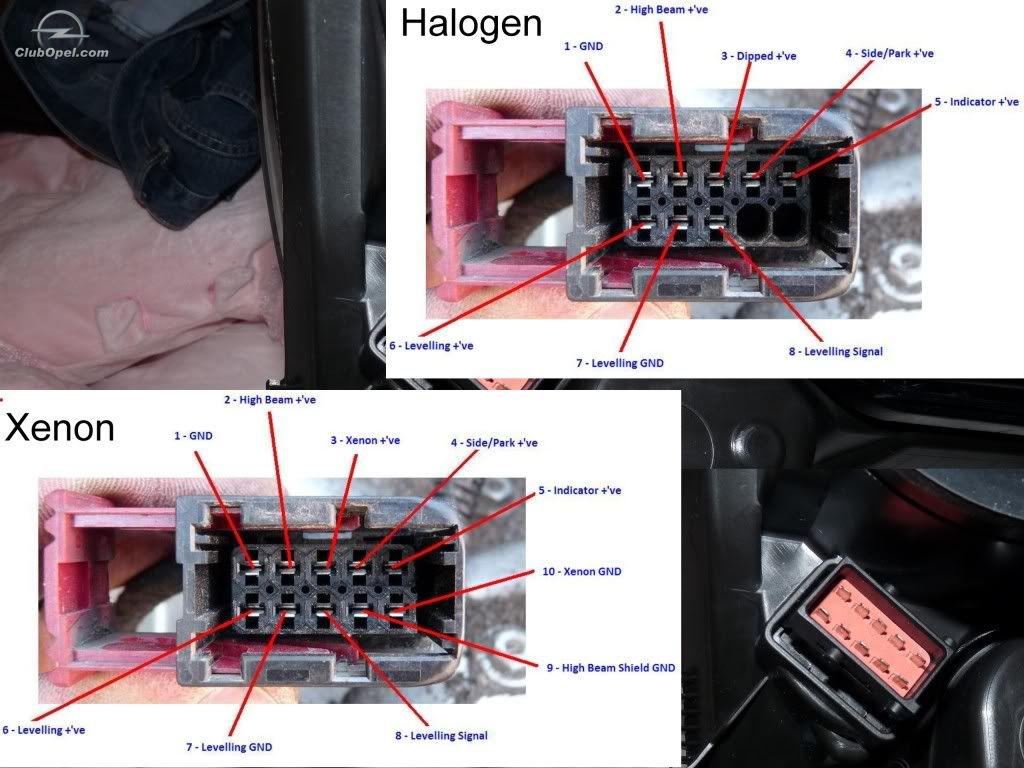
Guide - How to wire NON AFL Bi-Xenon Lights
Hi chaps
Here is a rough guide on how I wired the Non AFL Bi-xenon lights. Please read the whole guide before attempting any work, so you are familiar with all the parts involved.
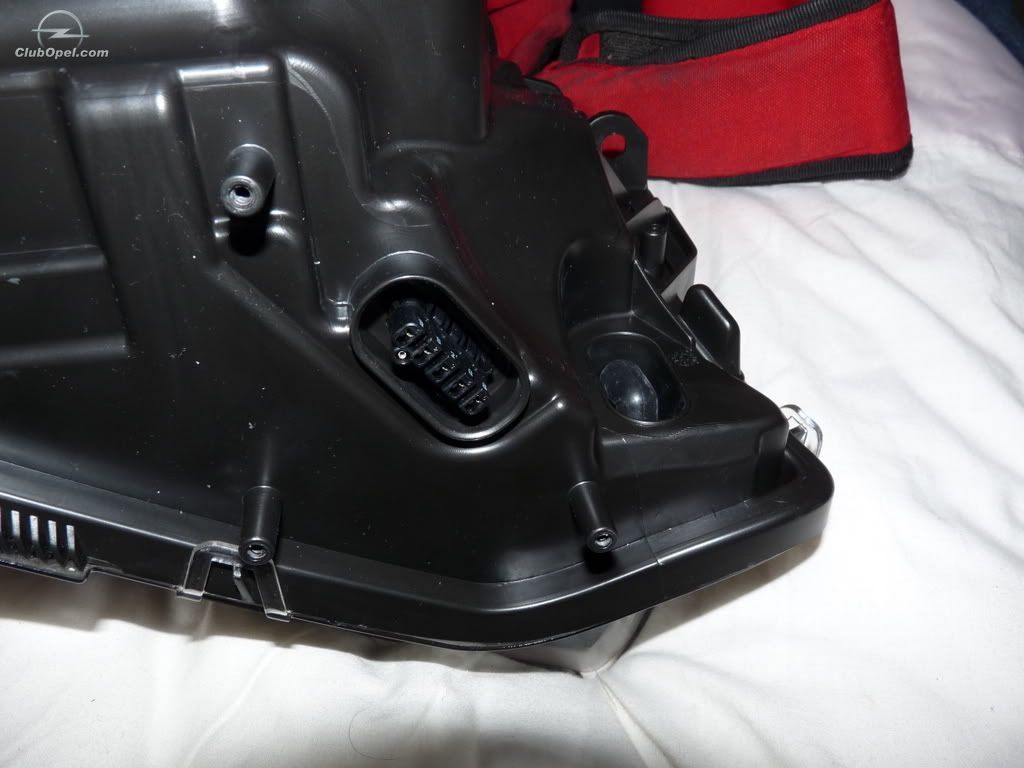
As you will have heard, these lights need a touch of modification before they are plug and play. This mainly due to the fact that the standard Astra H halogen loom uses 8 pins to the light, where as the Xenon one requires 10 pins. The 2 extra pins are just earths as shown in pic below.
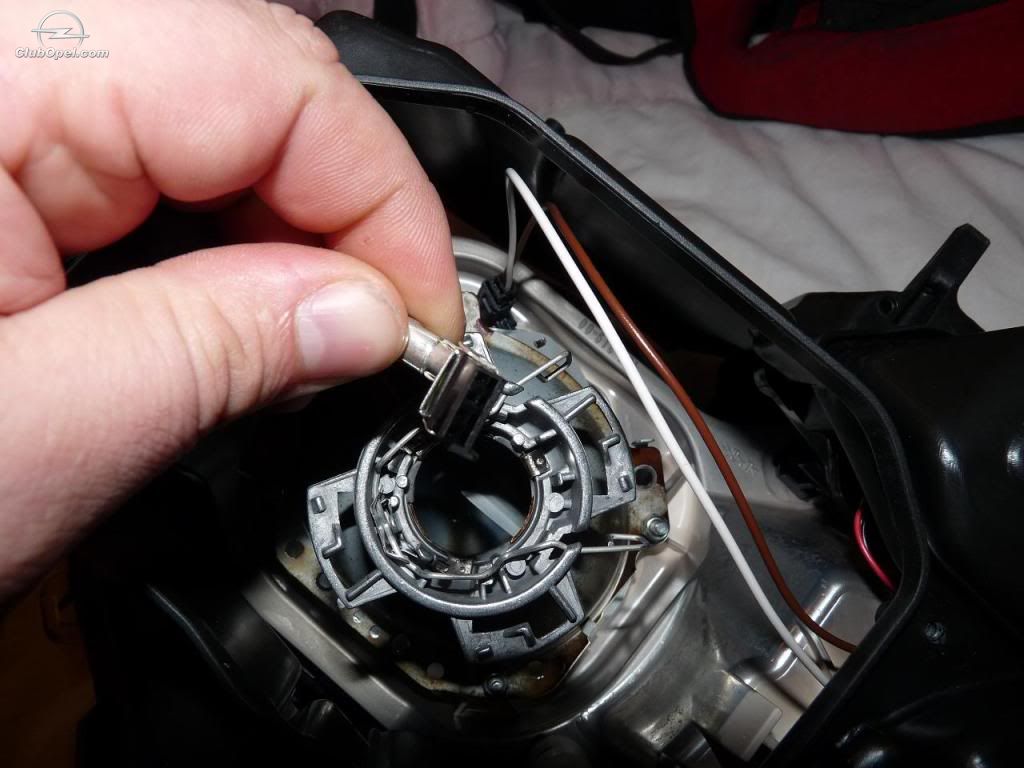
I found the easiest way of getting the additional earths was to work inside the light, rather than change the loom. If you feel confident in changing the loom, the effect wil be the same, but you still require to cut off the Hella ballast connector if using aftermarket xenons. The additonal earths inside the light are required for the ballast minus and the projector shield minus (movable shutter inside projector on high beam).
I located the earth which came off pin 1. This earth feeds into the minus for the halogen high beam. By working inside the light with the rubber cover off for the halogen hi beam, I cut the earth wire and added an electrical connector block an this is how I got the additional earths. So coming out of this block was the continue earth to the halogen bulb and 2 additional wires for the extra earths. The wires that require the extra earths inside the light are not quite long enough to reach this block, so I place in a couple of wires myself to reach the final destination of these wires.
The 2 wire to connect are as follows - Brown wire to projector -
and brown wire (which goes underneath the light with yellow +). This can be seen in the bottom right hans corner of the light under the halogen high beam -
Splice these wire into your additional earths.
The next bit to do is to remove the plug under the light if you are not using Hella Ballasts . Please note I do not know if the Hella ones will just plug in as the wire going up to the ballast connection has 4 wires and may need an additional loom to plug in into plug I removed - The cost of the Hella ballasts also put me off them
This is done by pushing it into the light. It has plastic clips either side and fairly easily pushes in. Now working via the access hole to the projector, fish out the plug.
The plug has the yellow and brown wire attached to it and coming off that is also the Hella ballast connection. I cut the yellow and brown wire, which completely removes this plug from the light. These yellow and brown wire are the + and - for you xenon ballasts.
I fitted Hids4U 35w 4300k kit. The ballasts for this kit had to mounted outside the light, however this is quite easy. To hole left by the plug is used for your ballast wires to pass through. I then mounted the ballast underneath the light, under the halogen side. There are pillars underneath the light and these rest on a tray under the mounted light to help support it. However, this tray does not extend under the halogen bit and leaves the perfect space for the ballast to fit. By using 2 of the pillars, there are holes in the end of these for screws. I placed in 2 screws and put then in half way. The ballast fits neatly between the pillars and I used a cable tie between the two screws to secure the ballast. An additional tie was attached to the bolt mounting point to make sure it was secure.
Job done - just fit
done some digging around on the vx tis2000 and found the following pinouts...
halogen...
pin1... high, low, park, turn gnd
pin2... high+
pin3... low+
pin4... park+
pin5... turn+
pin6... level+
pin7... level gnd
pin8... level signal
pin9... not used
pin10. not used
afl...
pin1... high, park, turn gnd
pin2... high+, afl motor+
pin3... xenon+
pin4... park+
pin5... turn+
pin6... level+
pin7... level signal
pin8... level gnd
pin9... afl motor gnd
pin10. xenon gnd
as you can see pin 7 and 8 is the wrong way round, this can quite easily be swapped round but i don't think it matters because the reason the manual levelling switch inside the car won't work with afls is that although the +, gnd and signal inputs are present to run the levelling motor, the inputs are sent to the afl controller first but as this is not being used it doesn't pass the inputs to the levelling motor.
i've looked at bypassing the afl controller and sending the inputs directly to the levelling motor but it needs 4 inputs to run and i only have 3, as yet i don't know what the missing input is and in what order they should be.
so to get the afls working all it looks like i have to do i wire up a ground to the xenon pin 10 but i'll also swap pin 7 and 8 and put in a ground at pin 9 for the afl motor, then i'll try and get the levelling motors working.
pics and more info to come...
Cine vrea sa faca un rezumat e binevenit 😊 ca sa fie mai usor.
Guide - How to wire NON AFL Bi-Xenon Lights
Hi chaps
Here is a rough guide on how I wired the Non AFL Bi-xenon lights. Please read the whole guide before attempting any work, so you are familiar with all the parts involved.
As you will have heard, these lights need a touch of modification before they are plug and play. This mainly due to the fact that the standard Astra H halogen loom uses 8 pins to the light, where as the Xenon one requires 10 pins. The 2 extra pins are just earths as shown in pic below.
I found the easiest way of getting the additional earths was to work inside the light, rather than change the loom. If you feel confident in changing the loom, the effect wil be the same, but you still require to cut off the Hella ballast connector if using aftermarket xenons. The additonal earths inside the light are required for the ballast minus and the projector shield minus (movable shutter inside projector on high beam).
I located the earth which came off pin 1. This earth feeds into the minus for the halogen high beam. By working inside the light with the rubber cover off for the halogen hi beam, I cut the earth wire and added an electrical connector block an this is how I got the additional earths. So coming out of this block was the continue earth to the halogen bulb and 2 additional wires for the extra earths. The wires that require the extra earths inside the light are not quite long enough to reach this block, so I place in a couple of wires myself to reach the final destination of these wires.
The 2 wire to connect are as follows - Brown wire to projector -
and brown wire (which goes underneath the light with yellow +). This can be seen in the bottom right hans corner of the light under the halogen high beam -
Splice these wire into your additional earths.
The next bit to do is to remove the plug under the light if you are not using Hella Ballasts . Please note I do not know if the Hella ones will just plug in as the wire going up to the ballast connection has 4 wires and may need an additional loom to plug in into plug I removed - The cost of the Hella ballasts also put me off them
This is done by pushing it into the light. It has plastic clips either side and fairly easily pushes in. Now working via the access hole to the projector, fish out the plug.
The plug has the yellow and brown wire attached to it and coming off that is also the Hella ballast connection. I cut the yellow and brown wire, which completely removes this plug from the light. These yellow and brown wire are the + and - for you xenon ballasts.
I fitted Hids4U 35w 4300k kit. The ballasts for this kit had to mounted outside the light, however this is quite easy. To hole left by the plug is used for your ballast wires to pass through. I then mounted the ballast underneath the light, under the halogen side. There are pillars underneath the light and these rest on a tray under the mounted light to help support it. However, this tray does not extend under the halogen bit and leaves the perfect space for the ballast to fit. By using 2 of the pillars, there are holes in the end of these for screws. I placed in 2 screws and put then in half way. The ballast fits neatly between the pillars and I used a cable tie between the two screws to secure the ballast. An additional tie was attached to the bolt mounting point to make sure it was secure.
Job done - just fit
done some digging around on the vx tis2000 and found the following pinouts...
halogen...
pin1... high, low, park, turn gnd
pin2... high+
pin3... low+
pin4... park+
pin5... turn+
pin6... level+
pin7... level gnd
pin8... level signal
pin9... not used
pin10. not used
afl...
pin1... high, park, turn gnd
pin2... high+, afl motor+
pin3... xenon+
pin4... park+
pin5... turn+
pin6... level+
pin7... level signal
pin8... level gnd
pin9... afl motor gnd
pin10. xenon gnd
as you can see pin 7 and 8 is the wrong way round, this can quite easily be swapped round but i don't think it matters because the reason the manual levelling switch inside the car won't work with afls is that although the +, gnd and signal inputs are present to run the levelling motor, the inputs are sent to the afl controller first but as this is not being used it doesn't pass the inputs to the levelling motor.
i've looked at bypassing the afl controller and sending the inputs directly to the levelling motor but it needs 4 inputs to run and i only have 3, as yet i don't know what the missing input is and in what order they should be.
so to get the afls working all it looks like i have to do i wire up a ground to the xenon pin 10 but i'll also swap pin 7 and 8 and put in a ground at pin 9 for the afl motor, then i'll try and get the levelling motors working.
pics and more info to come...
Cine vrea sa faca un rezumat e binevenit 😊 ca sa fie mai usor.
- GabiB77
- ****
- 2,346 mesaje
- din 05 Jul 2005
- Bucuresti
GabiB77
- Mesaje scrise: 2,346
- Locatie: Bucuresti
- Masina:
- Status: Offline
- Cont inregistrat: 05 Jul 2005
- Mesaj Privat
Deci sa facem un rezumat:
1. Pentru montare far Hella fara AFL trebuie creati pinii 9 si 10 si conectati la masa
2. Pentru montare far Hella cu AFL trebuie creati pinii 9 si 10 si conectati la masa, iar pinii 7 si 8 trebuie inversati
Pentru pinii 9 si 10 ar fi 2 variante... ori se mai adauga acesti pinii in mufa de pe masina care se conecteaza la far ori se leaga firele de la masa balastului de xenon si cel de la lamela care se ridica pentru faza lunga in interiorul lupei la pinul 1 sau la oricare masa in interior farului
Ramane de vazut cat de usor se adauga pini in mufa, asta ar fi varianta care se face o singura data sa nu fie nevoie la fiecare far sa taiem fire
LE: am facut o mica schema cu ajutorul lui TIS, deci Alex82, din cauya pinului 10 neconectat nu se aprindea XEONO original la tine si tot din aceeasi cauza nu se ridica nici lamela metalica aferenta fayei lungi din lupa
Ultima modificare făcută de GabiB77 la Mie 22 Dec, 2010 10:28 pm
- mikyboy
- *******
- 5,734 mesaje
- din 08 Dec 2006
- Insignia 2014 A20TDH
- Sibiu
mikyboy
- Mesaje scrise: 5,734
- Locatie: Sibiu
- Masina: Insignia 2014 A20TDH
- Status: Offline
- Cont inregistrat: 08 Dec 2006
- Mesaj Privat
- GabiB77
- ****
- 2,346 mesaje
- din 05 Jul 2005
- Bucuresti
GabiB77
- Mesaje scrise: 2,346
- Locatie: Bucuresti
- Masina:
- Status: Offline
- Cont inregistrat: 05 Jul 2005
- Mesaj Privat
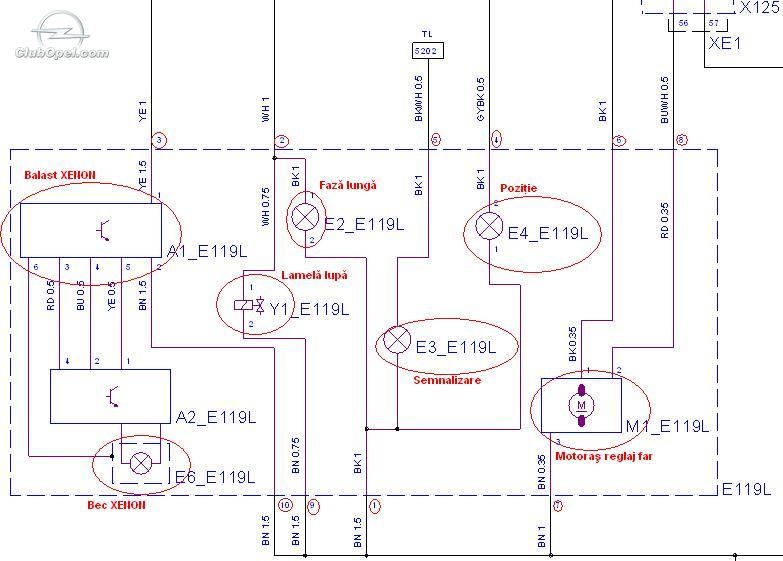
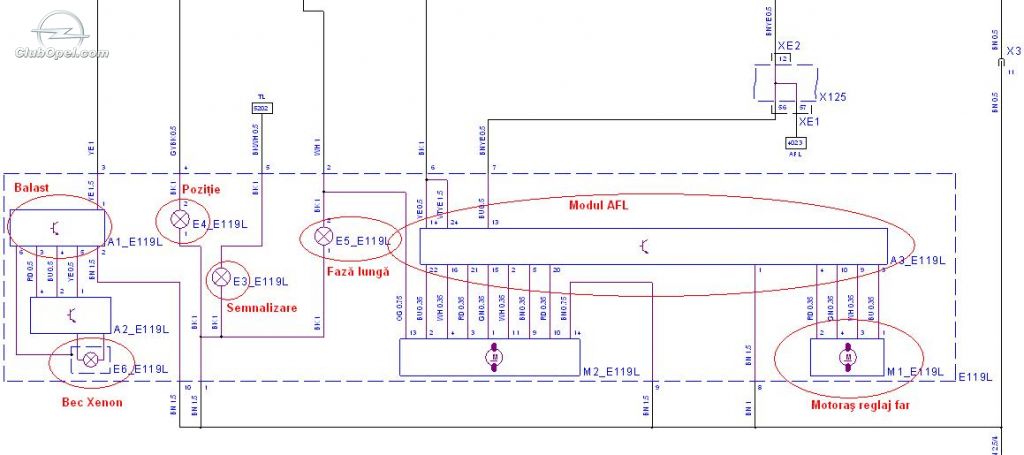
Daca in postul anterior am publicat schema unui far care nu are AFL din fabricatie, respectiv nu exista acea mufa, atasez schema unu far cu AFL din fabricatie
Dupa cum puteti observa, ceea ce am spus cu ceva timp in urma, la acest far, motorasul de reglaj sus-jos al farului nu este legat direct la pinii exteriori ai farului, respectiv 6,7 si 8, motorasul este legat la modului de sub far si in cazul asta acest motoras are 4 pini... Prin urmare, fara alte modificari acest motoras nu va functiona din rotita din blocul de lumini fara acel modul de sub far...
Se confirma cele culese de Alex82 mai sus, in cazul acestui tip de far trebuie inversati pinii 7 si 8 din mufa de conectare a farului, alaturi de inserarea a 2 pinii 9 si 10, conectati la masa
Ce semn de intrebare am eu daca acel motoras poate deveni functionabil, doar din schema nu-mi dau seama daca s-a putea conecta direct la pinii 6,7 si 8 la fel ca celalalt tip de far fara AFL, pentru ca nici macar codul culorilor de la cablaj nu ma ajuta 😕
PS: Ce nu observ in aceasta schema, fata de cea de la farul fara AFL, este lamela care culiseaza in interiorul lupei pentru faza lunga 🙄
- Lord Kilobyte
- **
- 105 mesaje
- din 30 Jan 2008
- Astra 2004 Z17DTH
- Prahova
Lord Kilobyte
- Mesaje scrise: 105
- Locatie: Prahova
- Masina: Astra 2004 Z17DTH
- Status: Offline
- Cont inregistrat: 30 Jan 2008
- Mesaj Privat
@GabiB-77 daca tot ai sarit pe mine in celalalt topic 😛 hai sa iti spun ce am facut :
- facut rost 1 bucata far stanga cu AFL nou si 1 bucata far dreapta fara AFL sh
- facut rost balasturi originale si ignitere Hella + 1 set becuri D2S 6000k
- polishat far dreapta si apoi aplicat folie transparenta antigriblura pe ambele faruri
- modificat fire far fara AFL : in interiorul farului firul maro ce vine la mufa balastului l-am unit cu firul maro ce vine la clapeta de la xenon si de acolo am tras un fir ce l-a unit cu un fir negru de la pozitie ( firul negru este firul ce vine de la pinul 1 GND din mufa de alimentare al farului )
- modificat mufa far cu AFL : datorita faptului ca nu ai acces la fire in acest tip de far am pus 2 pini 9 si 10 in mufa de alimentare a farului si apoi am unit cu firul maro de la pinul 1 GND, in cele din urma firele 7 si 8 le-am taiat si inversat
Bineinteles ca dupa ce am montat farurile totul functiona mai putin faza scurta ( se apindeau 2-3 secunde si apoi se stingeau )
Pentru a rezolva aceasta problema am apelat la un coleg al nostru de pe clubopel care m-a trimis la un baiat ce are Tech2 ( cu opcom nu se poate face nimic ).
Pentru a activa se urmeaza pasii:
-se intra la Body
-apoi IPU ECU , se selecteaza AHL Headlamps si apoi Programming
-se revine in meniul Body si se intra la EHU
-ultima optiune este Programming si acolo se alege tot AHL Headlamps si apoi Programming
Si normal ca a functionat .
Cand am fost sa reglez farurile am constatat ca reglajul pe verticala al farului stanga ( cel cu AFL ) nu functioneaza 😢 dar.....pentru a iesi totul ok am reglat farul stanga la o valoare optima si cel din dreapta umpic mai sus pentru ca pe acela pot sa il dau mai jos din butonul din bord.
Momentan nimeni din trafic nu s-a plans de reglajul facut si sunt foarte multumit de cum se vede faza scurta , nu mai zic de faza lunga care este lungaaaaa 😃
- GabiB77
- ****
- 2,346 mesaje
- din 05 Jul 2005
- Bucuresti
GabiB77
- Mesaje scrise: 2,346
- Locatie: Bucuresti
- Masina:
- Status: Offline
- Cont inregistrat: 05 Jul 2005
- Mesaj Privat
- Lord Kilobyte
- **
- 105 mesaje
- din 30 Jan 2008
- Astra 2004 Z17DTH
- Prahova
Lord Kilobyte
- Mesaje scrise: 105
- Locatie: Prahova
- Masina: Astra 2004 Z17DTH
- Status: Offline
- Cont inregistrat: 30 Jan 2008
- Mesaj Privat
- alex82
- **
- 123 mesaje
- din 19 Apr 2006
- Insignia 2012 2.0 dth
- Constanta
alex82
- Mesaje scrise: 123
- Locatie: Constanta
- Masina: Insignia 2012 2.0 dth
- Status: Offline
- Cont inregistrat: 19 Apr 2006
- Mesaj Privat
- Lord Kilobyte
- **
- 105 mesaje
- din 30 Jan 2008
- Astra 2004 Z17DTH
- Prahova
Lord Kilobyte
- Mesaje scrise: 105
- Locatie: Prahova
- Masina: Astra 2004 Z17DTH
- Status: Offline
- Cont inregistrat: 30 Jan 2008
- Mesaj Privat
Dan56- Suspendat
- 775 mesaje
- din 12 Feb 2009
- Astra 2008 Z13DTH
- Sibiu
Dan56- Mesaje scrise: 775
- Locatie: Sibiu
- Masina: Astra 2008 Z13DTH
- Status: Offline
- Cont inregistrat: 12 Feb 2009
- Mesaj Privat
- Lord Kilobyte
- **
- 105 mesaje
- din 30 Jan 2008
- Astra 2004 Z17DTH
- Prahova
Lord Kilobyte
- Mesaje scrise: 105
- Locatie: Prahova
- Masina: Astra 2004 Z17DTH
- Status: Offline
- Cont inregistrat: 30 Jan 2008
- Mesaj Privat
Intră în ClubOpel!
![]() Cea mai mare comunitate Opel
Cea mai mare comunitate Opel
![]() Întâlniri locale
Întâlniri locale
![]() Skip Ads
Skip Ads
![]() Vinzi/Cumperi
Vinzi/Cumperi
![]() Gratuit pe viață
Gratuit pe viață